Oct. 14, 2019
I saw Sipeed Maix Dock board in one of Andreas Spiess videos on YouTube. And I was very interested.
It turned out that the board is optimized for working with Micropython and is perfect for tasks in which object recognition is necessary.
Bingo! It was what I needed. By that time, I had just started developing a new project in which it was supposed to use computer vision to recognize objects. The project was based on Raspberry Pi3 microcomputer. But everything was not as good as I would like it to be. It took almost one day to install TenserFlow and OpenCV - software for objects recognition. RPi was getting very hot, crashed from time to time and showed a rather low FPS. I even thought to suspend the project and wait for the more powerful Raspberry Pi4 with 2/4GB RAM on board.
And here is such a gift of fate!
I immediately ordered this charm on Aliexpress for 23$. And in one week I had got in my mail box.
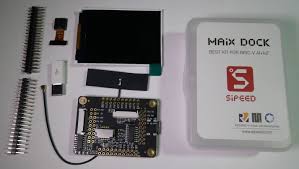
The board came very nice packaged in a small plastic box.And like you can see on the picture above, there are the board by itself, wifi antena, camera, display and microUSB to USB-c adapter in this kit.
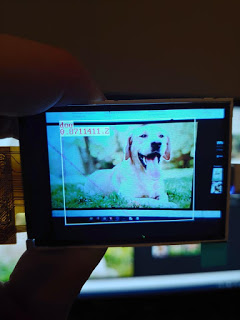
The device comes with firmware and a script preinstalled. The script activates camera on start up, so you can see live picture on the display. So myfirst thought was: "Oh, it is cool". The picture is quite good actually.
Next question was how to connect and program it?
So in the beginning I would say PuTTy is very nice choice if you are on Windows :). PuTTy lets you to connect to the device and enter REPL.
Set PuTTy like it is shown on the picture below.
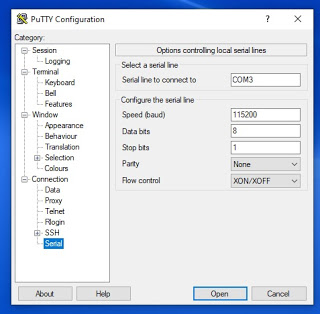
Let assume your board is powered up. Launch the PuTTy and click open. PuTTy will try to connect to your board. You will see a black screen immediately. And here we came to the tricky place for the beginners, or experienced developers with no experience with microcontrollers. Now you need to push "RST" button on your board. It isn't mention anywhere :). The button is located near the USB connector. As soon as you push this button, you will see Micropython REPL prompt.
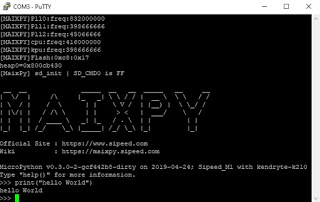
Now you can test how it works in a usual way by typing something like "Hello World" :).
Usage of PuTTy is a good way to check the connection and play a little bit around, but isn't suitable for a serious work with the board. For example you can't upload or download files.
if you are more serious about your intentions regarding Maix Dock board, there are some other softwares I would suggest to use.
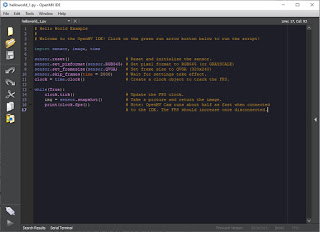
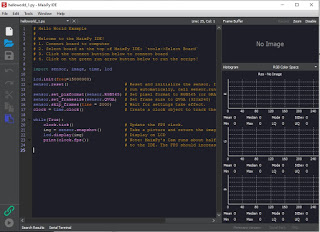
1.OpenMV IDE - there is written that it is for use with OpenMV cam, but it works also with Maix boards. The only problem is, that examples are for OpenMV cam and wouldn't work on Maix board without editing them.
You can execute file via terminal. and the cool thing is that it is actually not necessary to upload the script to the board to execute it. It means that you can open file or write it in IDE (it is even not necessary to save file before execution) and then execute. Very nice feature!.
Again it is impossible to upload/download files. There is such choice in "Tools", but it is not active. But you can upload your files to SD card and execute files from there, the board has SD reader.
2. MaixPy IDE - more or less the same OpenMV with slightly different interface and only one simple example.
3. uPyLoader - very simple program which let us to download/upload files to the board and also execute uploaded files. But here we do not have IDE.
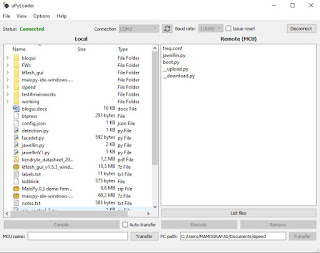
First time you use the program to transfer files, you need to initialize it. Click File->Init transfer files to complete the initialization. This will create two files in the board, __upload.py and __download.py.
What I noticed that connection is not very stable and it could be a problem to transfer bigger files. It drops connection and you have to try many times sometimes.
4. Kflash_gui - for upgrading firmware. It is cross platform software, so you can use it on Windows or Linux.
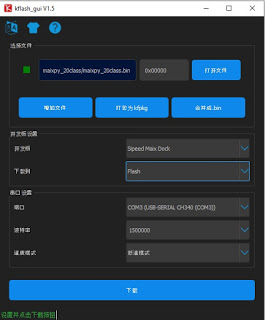
And no, I do not know Chinese language, the software is just buggy. After first start the GUI was in English, and later turned anyhow to Chinese version. But it is not a big issue, everything is quite clear. Set port, baud rate, choose firmware to upload and click blue button on the top right.
- The release version of the firmware is downloaded from the GitHub page
- The automated builds can be downloaded from here
Firmware files have the .bin or .kfpkg extension.
Burn firmware at address 0x00000.
As I understand this board is quite new on the market, so documentation isn't detailed enough, there are only few examples and tutorials on the web. If you can't find something on MaixPy Documentation web page - use search feature on the left top side of the page. I noticed that some information isn't listed, but it is there.
If you want to "taste" how objects detection works on this board, try this tutorial -
MaixPy Run 20-classes object detection based on tiny-yolov2 in 30 lines~
Download the zip archive from the page.
Burn firmware maixpy_20class.bin to your board with kflash_gui.
Then burn model 20class.kmodel to the board at the address 0x00300000. Also do not forget to change address in the script 20class.py at line 13. I don't know why but if I use the address 0x500000 like in this tutorial, it doesn't work.
Execute file.

Good luck!
If this project was interesting for you, you could buy me a cofee :)